
深入理解CRDT-YATA篇
前言
上一篇文章探讨了 RGA 算法的原理与实现,本文我们将介绍另一种 CRDT 算法——YATA。
YATA 全称为 Yet Another Transformation Approach,于 2016 年由 Kevin 在论文 Near Real-Time Peer-to-Peer Shared Editing on Extensible Data Types 中提出。
该论文不仅贡献了 YATA 算法,还给出了 YATA 算法的开源 CRDT 协同库——Yjs。
Yjs 有着良好的架构设计,运行性能、内存消耗方面都十分优异,而且有着良好的生态,是目前生产环境使用最广泛的 CRDT 算法。
因此 YATA 是学习 CRDT,入门协同的必经之路。
Near Real-Time Peer-to-Peer Shared Editing on Extensible Data Types论文详细阐述了协同算法的发展历史,尤其是介绍部分基本囊括了所有主流的协同算法,是学习协同算法的必读论文。
YATA
三条规则
YATA 认为文档是插入操作的集合,保证文档有序的关键是保证插入操作有序,因此 YATA 的核心是插入操作——o:
- :操作的唯一标识,由 lamport 时钟实现,即
[siteId, clock]; - :操作意图,操作创建时,左边相邻的操作项,不会改变;
- :左边操作项;
- :右边操作项;
- :操作是否被删除;
- :插入的内容。
插入操作抽象为,删除时,将的置为true;与是操作之间的左、右链接,构建出完整的插入有序链表。
遍历整个有序链表,筛掉被删除的操作,即可得到有序的文档内容。
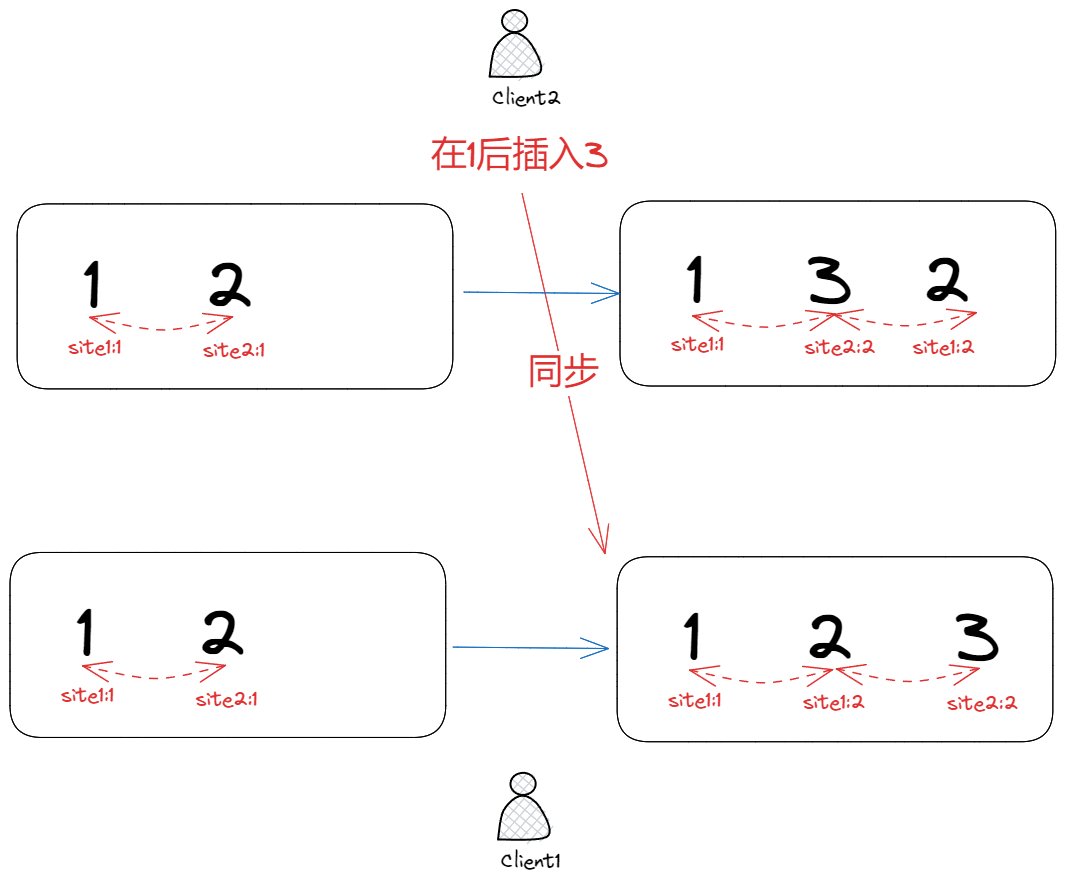
的存在是为了解决并发插入问题,如下图所示:
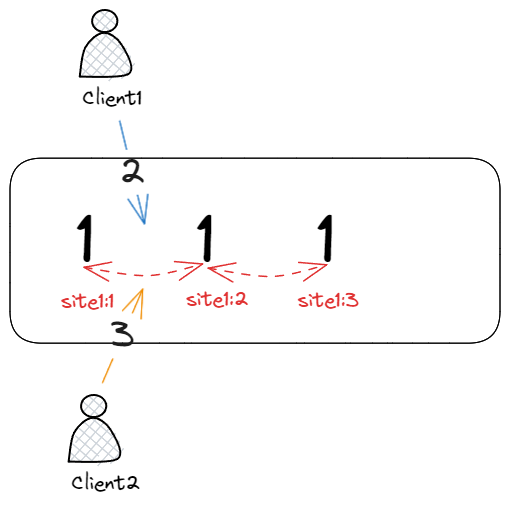
客户端 1、2 同时在文本111中的同一位置插入新的字符2,3,此时客户端 1、2 的操作都是并发的,因此无法确定谁先谁后,对于这类并发冲突 YATA 定义了 3 条规则:
- 禁止
origin连线交叉; - 插入操作必须严格按照顺序排列,如果与相邻,且在左边,即满足,那么不可能找到另外一个比大,同时比小,即不可能存在;
- 如果两个插入操作的
origin一致,那么id大的字符在右边;
规则 2 很好理解,插入操作必须严格按照顺序排列,否则无法保证文档的有序性。
规则 3 借鉴了 OT 算法,当两个操作的origin一致时,由于无法通过origin来比较顺序,因此按照id来比较,由于id是唯一且确定的,这样可以保证文档在任何客户端都能最终收敛到一致。
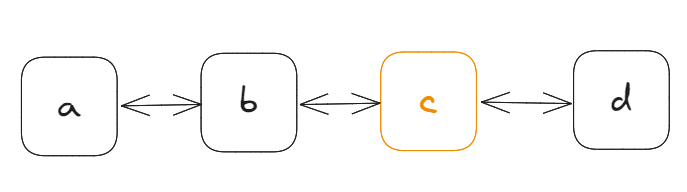
这里,笔者尝试用自己的理解来解释规则 1,首先,origin连线是这样的:
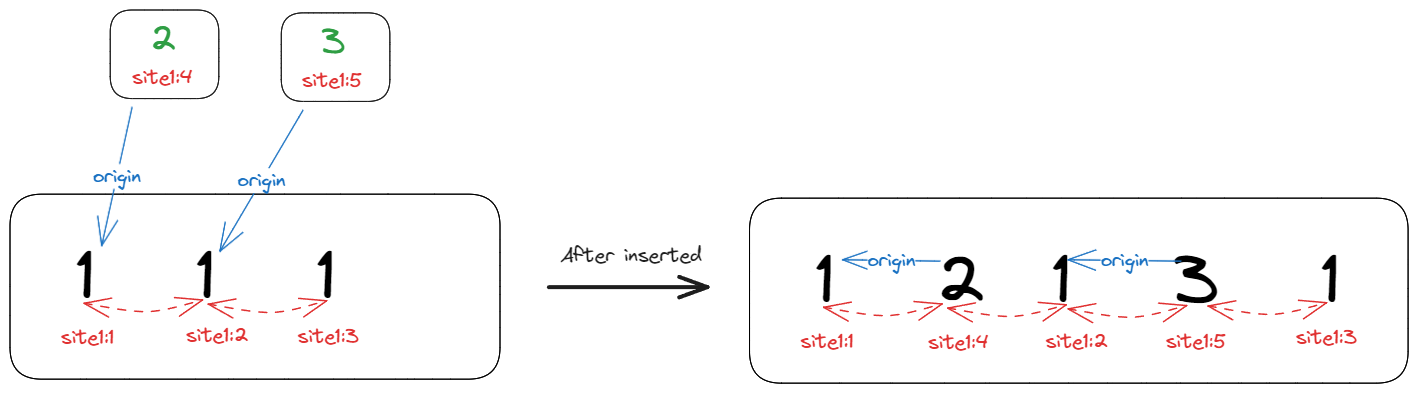
字符插入后,左右连线指向当前相邻的字符,而origin连线只会一直指向操作创建时的左边字符,并且不会改变。
origin连接不会交叉,即不会出现这样的情况:
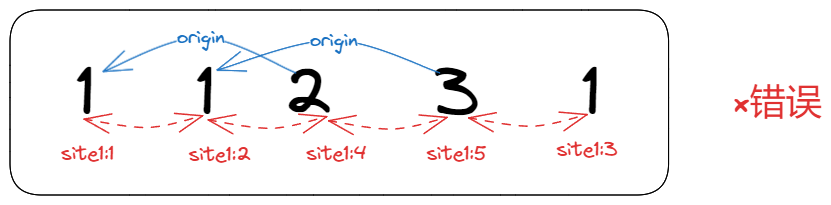
而下面的两种情况是允许的:

通过规则 1,操作意图origin与操作o这样就能得到如下的性质:
操作如果在操作的左边,通过规则 1,就能推导得出下面两种 case:
- case1,在的左边,即;
- case2,在的左边,或者 与是同一个操作,即。
有了 rule1,2,3,YATA 就能保证只要操作意图origin不变,那么插入操作在任意副本都能收敛到全局有序,即文档内容是一致的。
规则 1 不好理解,论文其实并没有给出为什么要引入规则 1,而是给出规则 1,2,3 后,通过严格的数学公式证明所有插入操作最终有序;当然这也足够了,明确前提条件,能够推理正确就算理解 YATA 了;对推理过程感兴趣的可以直接看论文。
插入算法
每次插入操作都需要满足上面的 3 条规则,如果不满足,就需要调整操作的位置,使其满足规则。这样就能得出插入算法:
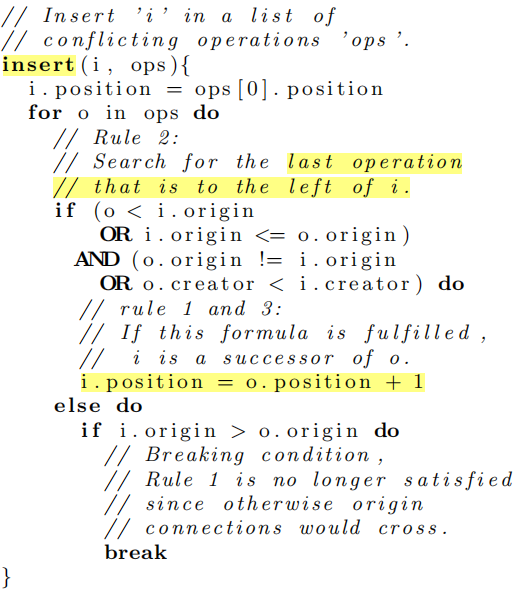
insert函数有两个参数:
i:插入操作,即;ops:与i有冲突的插入操作列表;
函数作用是将i插入到ops中,使其满足规则 1,2,3。
函数虽然只有 10 行左右的代码,但理解起来不容易,下面笔者尝试用自己的理解来解释这个函数。
将插入操作插入到ops中,实际是在寻找——,然后将插入到后面,即 。
需要满足上面的 3 条规则(:的;:的):
如果 ,那么origin存在交叉,无法满足,直接 break,对应算法中的breaking condition;
如果 ,或者 ,满足规则 1;
如果 ,需比较 creator,满足规则 3;
满足规则 1,3,那么 ,直至找到满足规则 2 的为止,对应图中的for range。
YATA 算法虽然推理起来很麻烦,但实际上最后的算法代码很少,对应到 Yjs 实现上也就是几十行代码而已。
案例
介绍完 YATA 原理后,可以体验一下 YATA 的实际案例,如下是一个纯文本编辑器:
只支持简单的英文、数字文本增、删,不支持中文、复制粘贴等操作。
没办法,input 中文事件笔者不会啊。
在左侧输入框中编辑文本内容,都会同步到对方,最终保证两个输入框的内容一致。
实现
在理解 YATA 算法的基础上,我们再来看看 YATA 的实现。
YATA 版
首先,抽象出 YATA 的插入操作:
export type Item<T> = {
  content: T;
  id: Id;
  isDeleted: boolean;
  origin: Id | null; // null if insert at doc's begin
};
Item包含了content、id、isDeleted、origin四个属性,分别对应 YATA 插入操作的、、、。
再看看文档的数据结构:
export class Doc<T> {
  content: Item<T>[];
  length: number;
  vector: Vector;
  clientId: string;

  public constructor(clientId?: string) {
    const cid = clientId ?? randomString(6);
    this.content = [];
    this.length = 0;
    this.vector = {};
    this.clientId = cid;
  }
}
Item中之所有没有、,是因为这里的实现没有选择双向链表,而是统一存储在Doc中的content列表。
content:文档内容,即Item列表;length:文档长度,筛掉删除的Item后的列表长度;vector:clock 向量;clientId:客户端 ID;
首先看看insert函数:
  public insert(pos: number, content: T) {
    const clock = this.vector[this.clientId] ?? -1;
    // origin is previous item of pos
    const i = this.findPositionByIndex(pos);
    // create current item of pos
    const item: Item<T> = {
      content,
      id: [this.clientId, clock + 1],
      isDeleted: false,
      origin: this.content[i - 1]?.id ?? null,
    };

    this.integrate(item);
  }
因为墓碑机制的存在,所以pos并不是content的下标,而是content中未删除的Item的下标,所以需要先通过findPositionByIndex函数找到pos对应的Item的下标i。
然后,创建Item,并调用integrate函数将其插入到content中,注意:origin是创建时的左侧Item节点。
整个insert的核心是integrate,对应 YATA 中插入解决冲突部分:
  private integrate(item: Item<T>) {
    const lastClock = this.vector[item.id[0]] ?? -1;
    const clock = item.id[1];
    if (lastClock + 1 !== clock) {
      throw new Error("Clock not match");
    }
    this.vector[item.id[0]] = clock;

    // origin always front of the item
    // the origin.right may be conflict with the item
    // find the right place for the item start with origin.right
    let origin = this.findItemById(item.origin);
    let destIndex = origin + 1;
    let scanning = false;

    // search o, which i is successor of o
    // ir < or < o < i
    // or < o < ir < i
    // or = ir < minClient(o, i) < maxClient(o, i)

    // The logic below can be summarized in these two lines:
    // if (oleft < left || (oleft === left && newItem.id[0] <= o.id[0])) break
    // if (oleft === left) scanning = newItem.id[0] <= o.id[0]
    for (let i = destIndex; ; i++) {
      if (!scanning) {
        destIndex = i;
      }
      if (i === this.content.length) {
        break;
      }

      const o = this.content[i];
      const oorigin = this.findItemById(item.origin);
      // Insert i before o
      // case1: or < ir < i < o => break
      // case2: or = ir < min(i, o) < max(i, o) => break
      if (oorigin < origin || (oorigin === origin && item.id[0] <= o.id[0])) {
        break;
      }
      if (oorigin === origin) {
        scanning = item.id[0] <= o.id[0];
      }
    }

    if (!item.isDeleted) {
      this.length += 1;
    }
    this.content.splice(destIndex, 0, item);
  }
- 首先,检查
clock是否连续,如果不连续则抛出异常; - 然后,根据
origin找到初始目标下标destIndex,即item的插入位置,因为并发冲突都是在origin后发生的,因此destIndex的初始值为origin的下标加 1; - 判断出
o与item之间是否满足 3 条规则,满足则后移,直至找到item的插入位置,不满足则跳出循环,即已找到插入位置; - 最后,将
item插入到content中。
delete函数十分简单,找到pos对应item然后标记isDeleted即可:
  public delete(pos: number) {
    const i = this.findPositionByIndex(pos);
    const item = this.content[i];
    if (!item) {
      throw new Error("Item not found");
    }
    item.isDeleted = true;
    this.length -= 1;
  }
Yjs 优化版
YATA 版实现了论文原有的插入算法,但这版插入算法其实有一个严重的 base case:
客户端 1,2 有同一段文本12,1是2的origin,现在客户端 2 向1插入了一个3,按照算法规则,文本会变成132;
可一旦操作同步到客户端 1,因为字符3的origin是1,且3的id大,因此会跑到2的后面,导致文本变成123,这就导致了双方最终内容不一致。
为了解决这个问题,yjs 引入了另外一个属性originRight,同时规定插入的操作排序后必须在originRight之前,这样客户端 2 插入3时,由于originRight是2,因此3会插入到2的前面,最终文本变成132,双方达成一致,这样就解决了这个问题。
有了originRight后,插入操作就变成了这样:
而这一版的实现,抽象出了新的Item类:
export type Item<T> = {
  content: T;
  id: Id;
  isDeleted: boolean;

  originLeft: Id | null; // null if insert at doc's begin
  originRight: Id | null; // null if insert at doc's end
};
originLeft:对应上面的origin;originRight:即 yjs 新增的originRight;
Doc定义不变,而insert函数有了些许变化:
  public insert(pos: number, content: T) {
    const clock = this.vector[this.clientId] ?? -1;
    // origin is previous item of pos
    const i = this.findPositionByIndex(pos);
    // create current item of pos
    const item: Item<T> = {
      content,
      id: [this.clientId, clock + 1],
      isDeleted: false,
      originLeft: this.content[i - 1]?.id ?? null,
      originRight: this.content[i]?.id ?? null,
    };
    this.integrate(item);
  }
item在新建时,需要同时指定originLeft和originRight,且后面不会再变化。另外 integrate 也增加了originRight的判断条件:
private integrate(item: Item<T>) {
    const lastClock = this.vector[item.id[0]] ?? -1;
    const clock = item.id[1];
    if (lastClock + 1 !== clock) {
      throw new Error("Clock not match");
    }
    this.vector[item.id[0]] = clock;
    let left = this.findItemById(item.originLeft);
    let right = this.findItemById(item.originRight);
    let destIndex = left + 1;
    let scanning = false;

    for (let i = destIndex; ; i++) {
      if (!scanning) {
        destIndex = i;
      }
      if (i === this.content.length) {
        break;
      }
      // 1. Must insert between originLeft and originRight
      if (i === right) {
        break;
      }

      const o = this.content[i];
      const oleft = this.findItemById(item.originLeft);
      const oright = this.findItemById(item.originRight); // 2.
      if (
        oleft < left ||
        (oleft === left && oright == right && item.id[0] <= o.id[0]) // 3.
      ) {
        break;
      }
      if (oleft === left) {
        scanning = item.id[0] <= o.id[0];
      }
    }

    if (!item.isDeleted) {
      this.length += 1;
    }
    this.content.splice(destIndex, 0, item);
  }
上面的注释 1、2、3 处增加了originRight的判断,即必须在originLeft和originRight之间,这样就保证了插入的顺序。
TinyYjs
yjs 是目前生产环境使用最为广泛 CRDT 库,其设计思想和实现优化都非常值得学习。
TinyYjs 是笔者实现的一个精简版 yjs,支持YMap,YArray,YText(纯文本,不支持富文本)三种数据类型,实现了基本的 CRDT 功能,但没有实现 yjs 的优化,因此可以作为一个学习 yjs 的入门项目。
YArray:insert(index, content)get(index): anydelete(index)toArray(): any[]
YText:insert(index, content)get(index): anydelete(index)toString(): string
YMap:set(key, value)get(key): anydelete(key)has(key): booleantoJSON(): any
下面分别就这 3 个基础类型来介绍 TinyYjs 的实现。
数据建模
在 tinyyjs 中,每个插入操作被抽象为Item:
export class Item {
  content: ContentAny;
  id: Id;
  isDeleted: boolean;

  originLeft: Id | null; // null if insert at doc's begin
  originRight: Id | null; // null if insert at doc's end

  left: Item | null;
  right: Item | null;

  parent: AbstractType | null;
  parentSub: string | null;

  public constructor(
    content: ContentAny,
    id: Id,
    isDeleted: boolean,
    originLeft: Id | null,
    originRight: Id | null,
    left: Item | null,
    right: Item | null,
    parent: AbstractType | null,
    parentSub: string | null
  ) {
    this.content = content;
    this.id = id;
    this.isDeleted = isDeleted;
    this.originLeft = originLeft;
    this.originRight = originRight;
    this.left = left;
    this.right = right;
    this.parent = parent;
    this.parentSub = parentSub;
  }
}

export class Doc {
  share: Map<string, AbstractType>;
  vector: Vector;
  clientId: string;
  store: Map<string, Item[]>; // client id => item list

  public constructor(clientId?: string) {
    const cid = clientId ?? randomString(6);
    this.share = new Map();
    this.vector = {};
    this.clientId = cid;
    this.store = new Map();
  }
}
content,id,isDeleted,originLeft,originRight与上面保持一致;left,right是链表的左右指针,分别指向前后两个操作;
Doc.share是一个Map,key 是AbstractType的名字,value 是AbstractType的实例。
Item.parent 指向父节点AbstractType;AbstractType是 YArray,YMap,YText 等数据类型的基类,一个Item属于一个AbstractType,这样Doc就能支持多数据类型。如下:
  public getText(name: string = ""): YText {
    if (!this.share.has(name)) {
      const at = new YText(this);
      this.share.set(name, at);
    }
    return this.share.get(name) as YText;
  }

  public getArray(name: string = ""): YArray {
    if (!this.share.has(name)) {
      const at = new YArray(this);
      this.share.set(name, at);
    }
    return this.share.get(name) as YArray;
  }
如果Item的 parent 为空,代表该Item是游离节点,会被垃圾回收掉。
对于 YArray,YText 这类线性数据结构而言,Item之间通过连续的双向链表连接在一起,如下图:
对于 YMap 而言,Item之间是分离的,如下图:
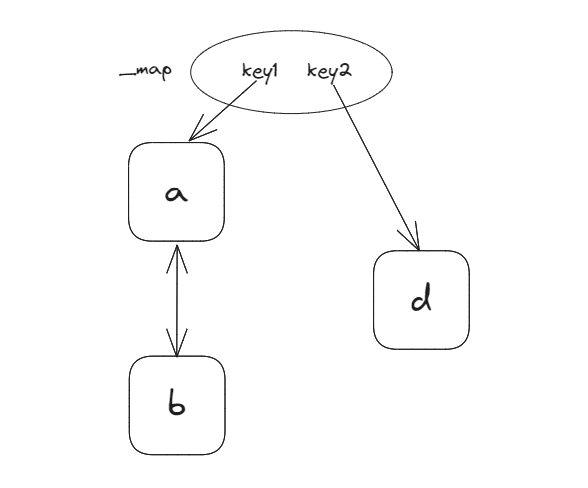
Item.parentSub用来表示YMap的 key,Item是YMap的 value,一个key上的value可能会被多个客户端操作,因此value是一个小双向链表。
遵循LWW(Last Write Won)规则,最后写入的Item会覆盖之前写入的Item,上图中key1下有两个Item,而生效的是a。
Doc.share中所有的AbstractType实例,其Item都会被存储在Doc.store中,key 是clientId,value 是Item数组。
冲突解决
数据建模是 tinyyjs 参考 yjs 简化而来,并以此支持多数据类型,由于是多种数据类型,因此冲突解决需要稍加改变一下:
  public integrate(doc: Doc) {
    const parent: AbstractType = this.parent!;
    const parentSub = this.parentSub;
    const getItem = (id: Id | null) => doc.getItem(id);
    if (
      (!this.left && (!this.right || this.right.left !== null)) ||
      (this.left && this.left.right !== this.right)
    ) {
      let left = this.left; // 插入时的左边节点,即插入origin

      let o; // 是否具有冲突的节点
      // set o to the first conflicting item
      if (left !== null) {
        // list, text set left to the first conflicting item
        o = left.right;
      } else if (parentSub !== null) {
        // map sets left to the first item with the same key
        o = parent._map.get(parentSub) || null;
        while (o !== null && o.left !== null) {
          // map, set o to the first item of key
          o = o.left;
        }
      } else {
        o = parent._start; // default set o to the first item
      }

      const conflictingItems = new Set();
      const itemsBeforeOrigin = new Set();
      // Let c in conflictingItems, b in itemsBeforeOrigin
      // ***{origin}bbbb{this}{c,b}{c,b}{o}***
      // Note that conflictingItems is a subset of itemsBeforeOrigin
      while (o !== null && o !== this.right) {
        itemsBeforeOrigin.add(o);
        conflictingItems.add(o);
        if (Id.compare(this.originLeft, o.originLeft)) {
          // case 1
          if (o.id[0] < this.id[0]) {
            // 如果o的clientID小于this的clientID,那么o在this的左边,大的在右边
            left = o;
            conflictingItems.clear();
          } else if (Id.compare(this.originRight, o.originRight)) {
            // 右插入意图相同,则直接break
            // this and o are conflicting and point to the same integration points. The id decides which item comes first.
            // Since this is to the left of o, we can break here
            break;
          } // else, o might be integrated before an item that this conflicts with. If so, we will find it in the next iterations
        } else if (
          o.originLeft !== null &&
          itemsBeforeOrigin.has(getItem(o.originLeft))
        ) {
          // use getItem instead of getItemCleanEnd because we don't want / need to split items.
          // case 2
          if (!conflictingItems.has(getItem(o.originLeft))) {
            left = o;
            conflictingItems.clear();
          }
        } else {
          break; // 直接break,会发生意图交叉
        }
        o = o.right;
      }
      this.left = left;
    }
    // reconnect left/right + update parent map/start if necessary
    if (this.left !== null) {
      const right = this.left.right;
      this.right = right;
      this.left.right = this;
    } else {
      let r;
      if (parentSub !== null) {
        r = parent._map.get(parentSub) || null;
        while (r !== null && r.left !== null) {
          r = r.left;
        }
      } else {
        r = parent._start;
        parent._start = this;
      }
      this.right = r;
    }
    // for map
    if (this.right !== null) {
      this.right.left = this;
    } else if (parentSub !== null) {
      // set as current parent value if right === null and this is parentSub
      parent._map.set(parentSub, this);
      if (this.left !== null) {
        // this is the current attribute value of parent. delete right
        this.left.delete();
      }
    }
    doc.addItem(this);
  }
这段冲突解决代码几乎与 yjs 一致,这里简单解释一下。
Item插入时,Item.left会被初始化为Item.originLeft,因此与其有冲突的节点从Item.left开始,直到Item.right,这些节点都有可能是冲突节点。- 如果是 YArray,YText,第一个冲突节点是
left.right,如果是 YMap,第一个冲突节点是parent._map.get(parentSub)对应的最左边节点; - 插入位置需要遵循 3 条规则,虽然改成了双向链表,但是判断逻辑基本一致;
- 最后,将
Item插入到链表中。
对于 tinyyjs 的介绍就到这里,感兴趣的可以查看源码。
结语
关于 YATA 算法,就介绍到这里。
后续文章会对 yjs 实现做一次解密,看看明星 CRDT 库是如何实现的。