
深入理解CRDT-RGA篇
前言
上一篇文章我们介绍了 CRDT 的基本概念,探讨了一些基础 CRDT 的实现。从本篇文章开始,我们将深入两种 CRDT 算法:
这两种算法分别是知名 CRDT 库 Automerge 和 Yjs 所采用的算法,被广泛应用于生产环境,是深入 CRDT 应用的基础。
本篇文章我们将介绍 RGA 算法,下一篇文章我们将介绍 YATA 算法。
RGA
RGA 全称 Replicate Growable Array 可复制增长数组,由 Hyun 于 2011 年在论文Replicated abstract data types: Building blocks for collaborative applications中提出(2011 年真的是 CRDT 爆发的一年)。
千万别被名字吓到了,其实 RGA 就是列表的 CRDT 实现。论文原话是:
growable array is the Vector class of JAVA or STL.
论文中提到 RGA 在有序复制集合上拥有良好的插入、删除性能,优于已有的 OT 算法,适合用于协同文本编辑场景。
当然 RGA 不仅适用于有序文本,同时也能推广到有序列表,哈希表等场景,因此 RGA 也是 Automerge 库的基础。
论文中,给出了 RGA 基于双向链表实现的部分伪代码,如下:
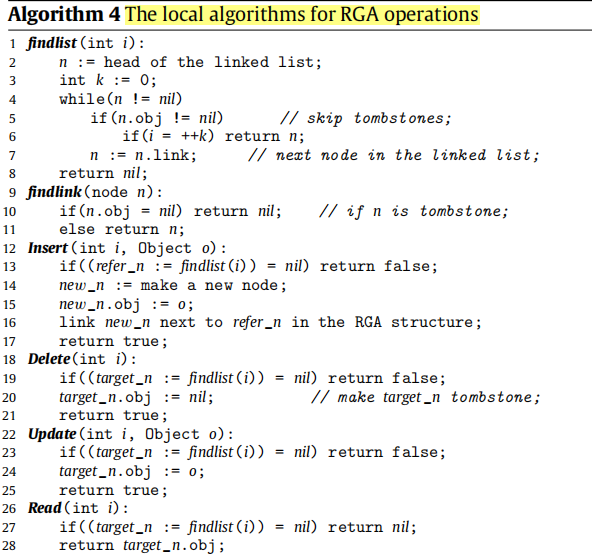
伪代码实现十分简单,无论是插入还是删除,都是在链表中排除已删除项,找到i对应的位置,然后插入或删除即可。
不过,双向链表显然无法满足大文本编辑、查找等场景的性能要求,因此有不少优化版的 RGA 实现,比如:
- Automerge 中 RGA 是基于 B+树实现的;
- Cola中 RGA 是基于 G-tree 实现的;
- RGATreeSplit使用平衡树来优化 RGA;
案例
下面,以纯文本协同编辑为例,看看 RGA 是如何工作的。
只支持简单的英文、数字文本增、删,不支持中文、复制粘贴等操作。
没办法,input 中文事件笔者不会啊。
在左侧输入框中编辑文本内容,都会同步到对方,最终保证两个输入框的内容一致。
推演
文本内容本质上是插入操作的集合,因此我们可以通过插入操作来推演 RGA 的工作原理。
下面,以纯文本协同编辑为例,看看 RGA 是保证多方编辑内容最终一致的。
首先,我们看一个最简单的例子:有且只有一个客户端进行编辑
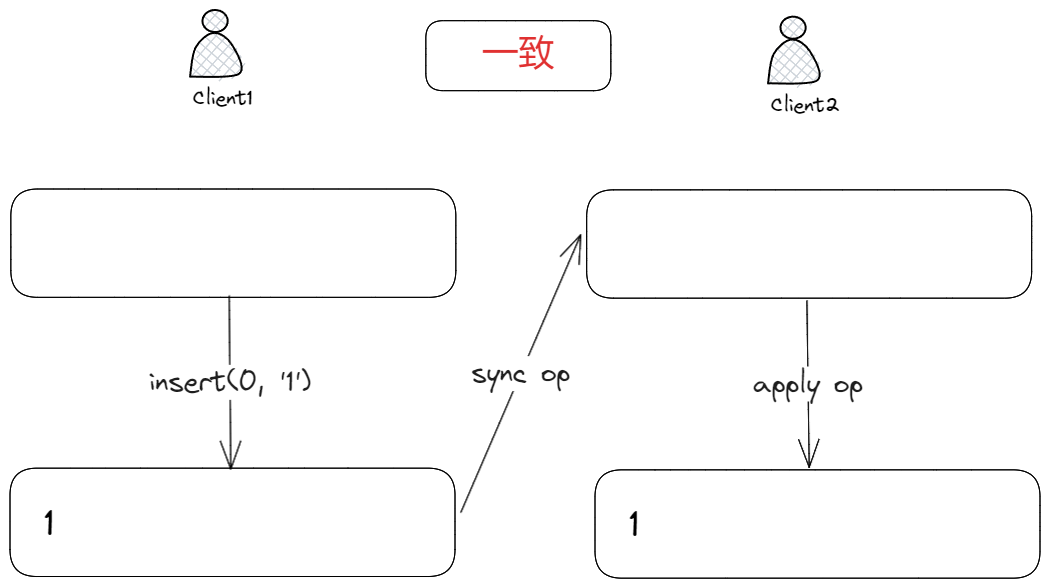
客户端 1 在位置0插入字符1,并将插入操作(op)同步到客户端 2,客户端 2 收到 op 并应用后,将1插入到位置0,此时客户端 1 和客户端 2 的文本内容是一致的。
因为只有客户端 1 有编辑操作,其它客户端处于只读状态,那么就不能产生编辑冲突,因此最后的文本内容肯定是一致的。
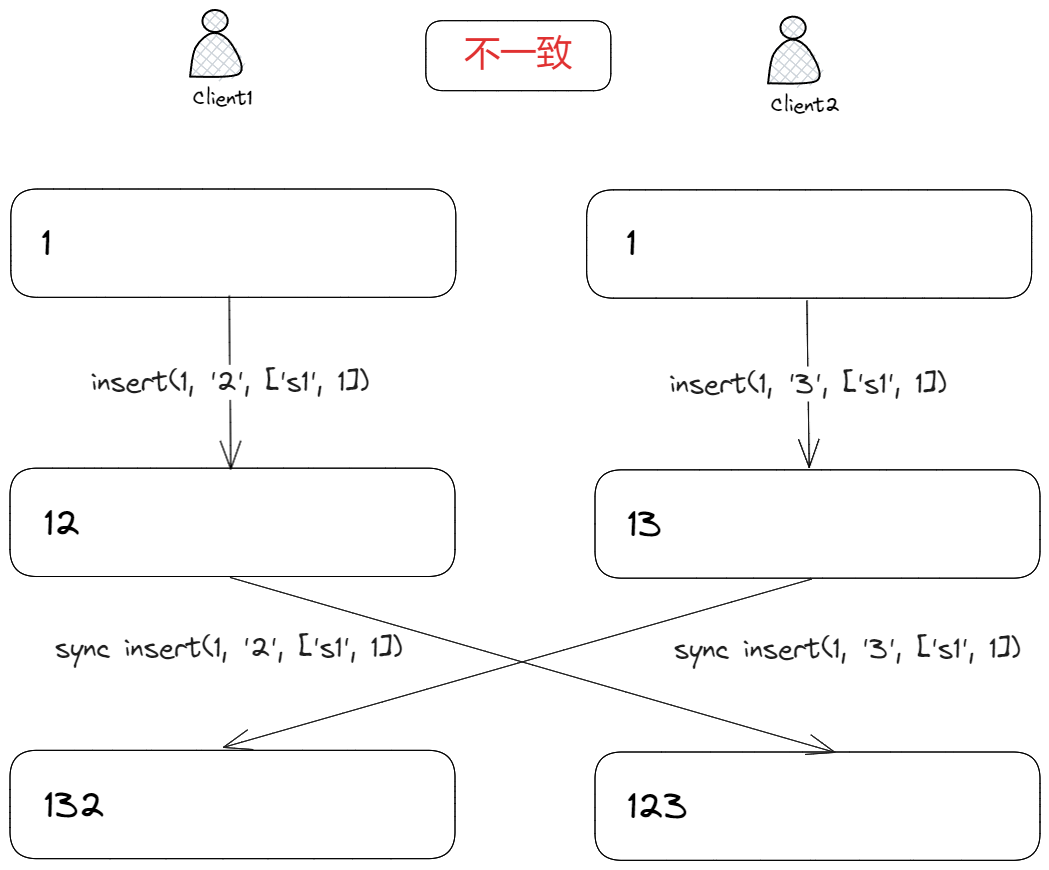
可一旦有多个客户端同时进行编辑,就会产生编辑冲突,导致最终文本内容不一致,比如:
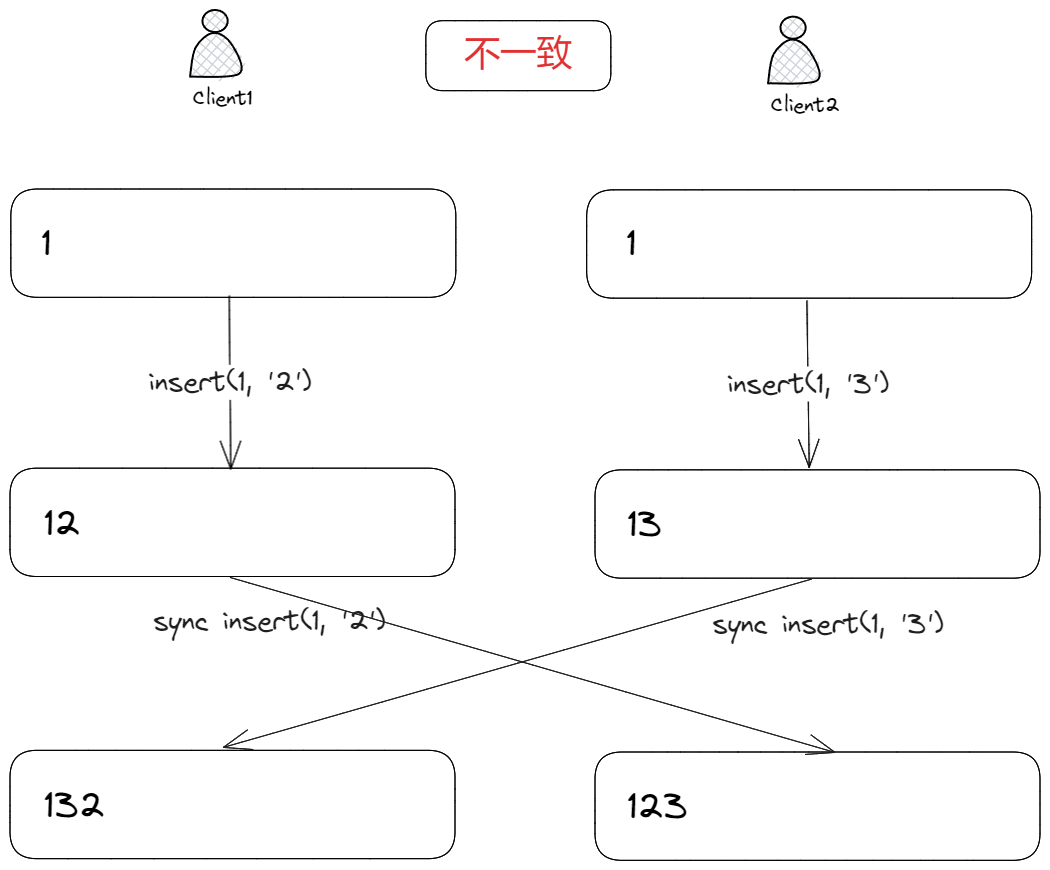
客户端 1、2 分别在位置1插入字符2、3,并将插入操作(op)同步到对方应用后,此时客户端 1 和客户端 2 的文本内容不一致。
而产生不一致的原因是,操作同步的数据:
insert(1, "2");
虽然携带了插入位置1和插入数据2,但没有其它约束条件,导致最终文本内容不一致。
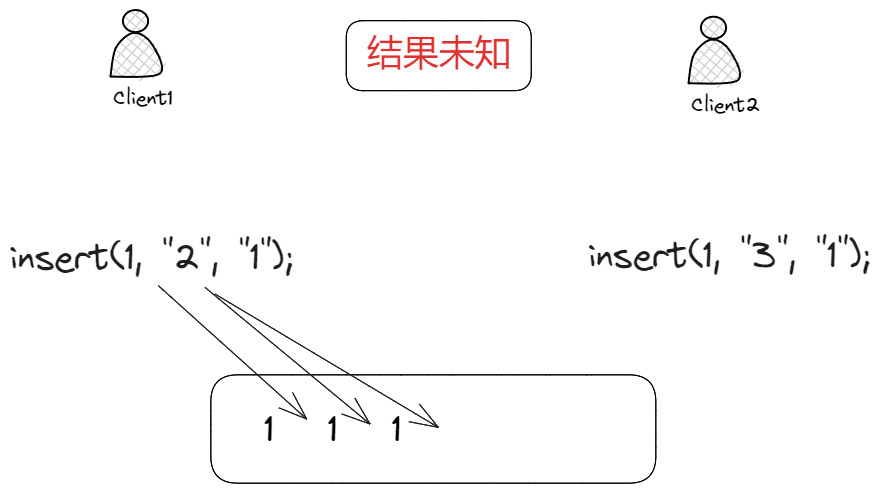
我们可以通过插入意图来解决这个问题:
client1: insert(1, "2", "1");
client2: insert(1, "3", "1");
这里,"1"就是插入意图,表示在1之后插入2,3,但这样就能保证最终文本内容一致吗?
显然是不能的,因为1虽然是插入意图,但是文本中可能存在多个1,比如:
我们为每个插入字符都添加一个唯一的标识符 Id,比如字符1的 Id:
// [siteId, counter]
export type Id = [string, number];
Id 包括两部分,第一部分是客户端的唯一标识符,第二部分是客户端操作的序号,这样就能保证每个字符都有唯一的 Id。
有了 Id 后,操作同步数据就变成了:
// params:
// 1. 插入位置
// 2. 插入数据
// 3. 插入意图,即当前插入位置字符的 Id
insert(1, "2", ["site1", 1]);
这样能够保证最终文本内容一致了吗?如下:
客户端 1、2 分别在位置1插入字符2、3,因为两个插入操作的意图是一致的,都插入在字符1右侧,但字符2,3之间位置暂时不知如何排列,从而导致最终文本内容不一致。
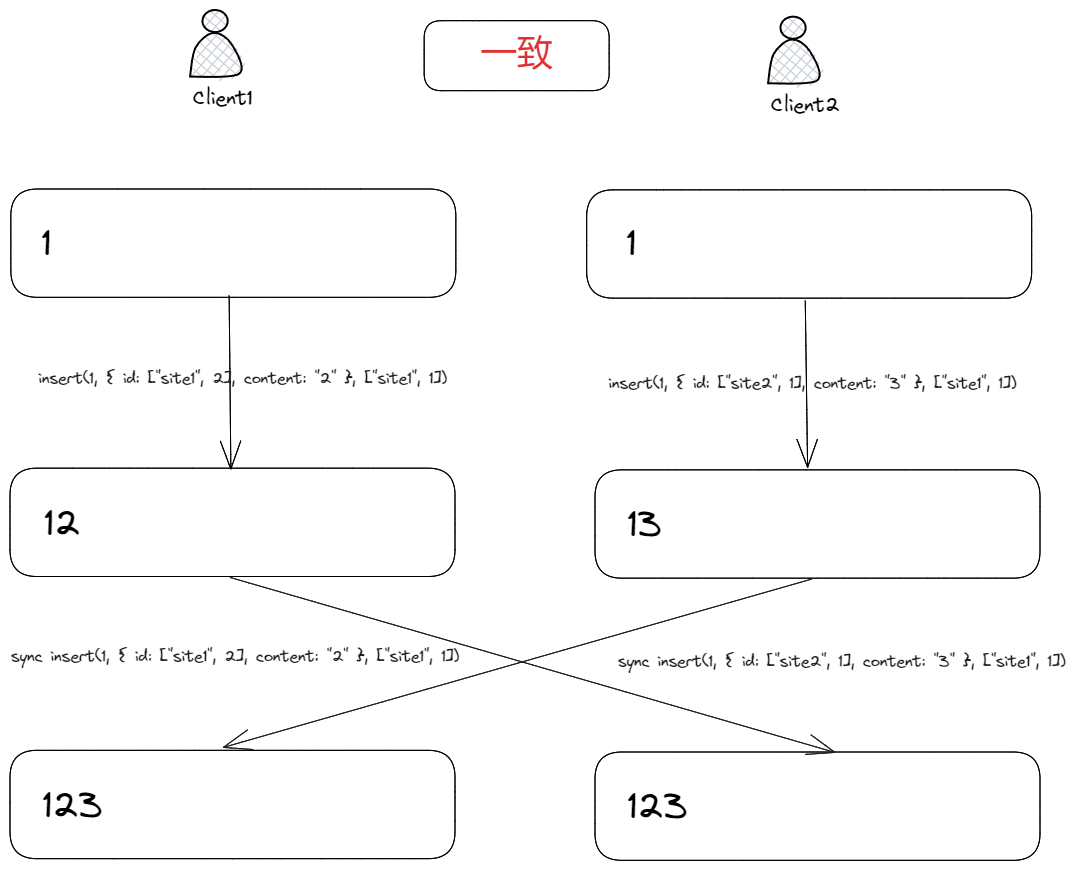
我们可以通过字符2,3的 Id 来解决二者之间的插入排序问题,即:
client1: insert(1, { id: ["site1", 2], content: "2" }, ["site1", 1]);
client2: insert(1, { id: ["site2", 1], content: "3" }, ["site1", 1]);
约定,如果插入意图一致,那么就按照字符 Id 来排序:
- 如果
counter不同,那么按照counter排序,大者在右边; - 如果
counter相同,那么按照siteId排序,大者在右边;
有了排序后,最终文本内容就一致了:
最后,来看看删除操作,我们将一次插入抽象为一个Item,即:
export type Item<T> = {
  content: T | null; // 插入内容
  id: Id; // Id
  parent: Id | null; // 插入意图
};
至于删除,最容易想到的是将Item直接删除掉,但这显然不行,因此不同客户端可能在同一个插入意图上工作,如果将字符删除掉了,那么意图也就丢失了,文本最终内容也就不一致了。
因此,我们不能直接删除Item,而是引入墓碑机制,即:
export type Item<T> = {
  content: T | null; // 插入内容
  id: Id; // Id
  isDeleted: boolean;
  parent: Id | null; // 插入意图
};
删除Item时,将isDeleted设置为 true,这样就能保留插入意图,从而保证最终文本内容一致。
实现
充分推演后,我们就能给出一个简单 RGA 的实现了。
首先是数据建模,每个插入字符操作被抽象为一个Item:
export type Item<T> = {
  content: T | null; // root item has no content
  id: Id;
  isDeleted: boolean;
  children: Id[]; // children of this item
  parent: Id | null; // parent of this item
};
parent:插入意图;children:子节点,每个字符都可能成为多个字符的意图,因此子节点可能有多个;
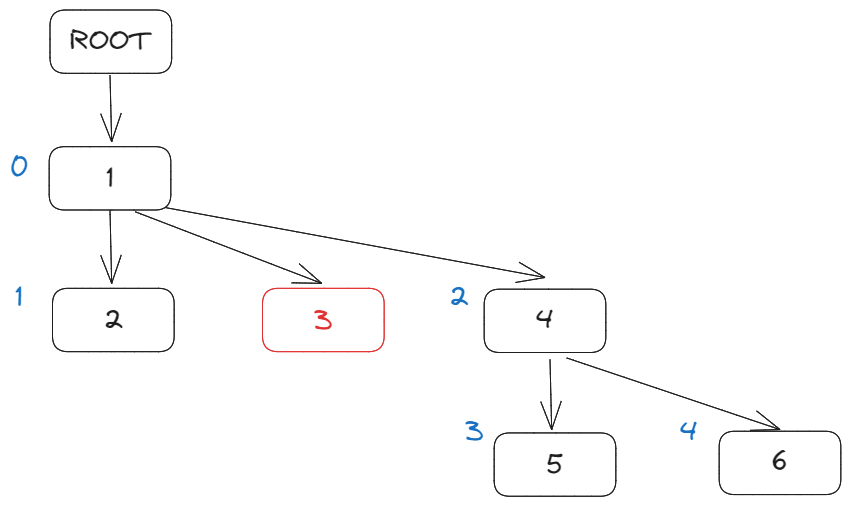
很明显,这样的数据结构导致文本内容是一个树:
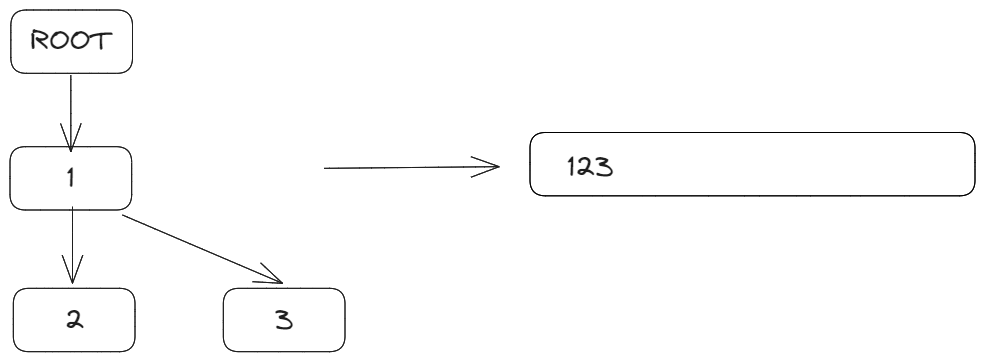
ROOT 节点是虚拟节点,标识文档的开始,没有实际意义。
因此我们可以使用Map来存储Item,其中key是Item.id,value是Item。
export class Doc<T> {
  root: Id;
  length: number;
  vector: Vector;
  clientId: string;
  store: Map<string, Item<T>>;

  public constructor(clientId?: string) {
    const cid = clientId ?? randomString(6);
    const root = {
      content: null,
      id: [cid, 0],
      isDeleted: false,
      children: [],
      parent: null,
    } as Item<T>;

    // Root item should insert at the beginning, and could not be deleted or updated
    this.root = root.id;
    this.length = 0; // Exclude root item
    this.vector = {
      [cid]: 0,
    };
    this.clientId = cid;
    this.store = new Map([[Id.hash(root.id), root]]);
  }
}
root:文档的根节点,虚拟节点;length:文档长度,不包括根节点;vector:客户端向量;clientId:客户端唯一标识符;store:存储Item的Map;
新建Doc时,向store中插入根节点,同时设置length、vector。
由于整个文档是一颗树,每个字符是其中一个节点,获取文档内容时,我们需要遍历整个树,将所有字符拼接起来:
  public getContent(): T[] {
    const doc = this;
    const content: T[] = [];
    const queue: Id[] = [];

    queue.push(doc.root);
    while (queue.length > 0) {
      const id = queue.shift()!;
      const item = doc.store.get(Id.hash(id))!;
      if (!item.isDeleted && item.content !== null) {
        content.push(item.content);
      }
      queue.push(...item.children);
    }

    return content;
  }
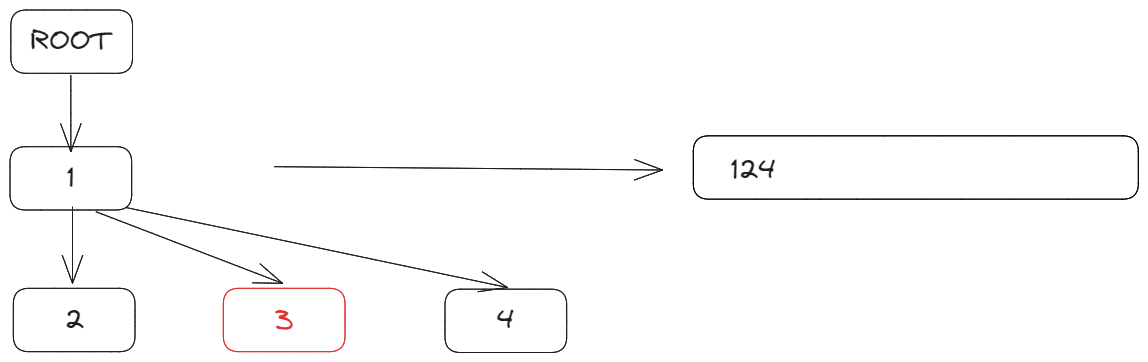
由于字符3被软删除掉了,因此最终文本内容是[1, 2, 4]。
接下来是插入操作,插入操作的核心是生成Item,然后将集成(intergrate,下文再详谈)到文档树中。
  public insert(pos: number, content: T) {
    const item = this.findItemByIndex(pos - 1);
    if (!item) {
      throw new Error("Item not found");
    }

    const newItem = {
      content,
      id: [this.clientId, this.vector[this.clientId] + 1],
      isDeleted: false,
      children: [],
      parent: item.id,
    } as Item<T>;

    this.integrate(newItem);
  }
insert将字符插入到pos位置,因此需要找到pos-1位置的Item作为其插入意图 parent,然后生成新的Item,最后将其集成到文档树中。
findItemByIndex使用 DFS 遍历文档树,排除掉删除字符,找到pos位置的Item:
  private findItemByIndex(pos: number): Item<T> | null {
    if (pos === -1) {
      return this.store.get(Id.hash(this.root))!;
    }

    const queue: Id[] = [];
    let i = pos;
    // DFS
    queue.push(this.root);
    while (queue.length > 0) {
      const id = queue.shift()!;
      const item = this.store.get(Id.hash(id))!;
      if (item.content === null) {
        queue.push(...item.children);
        continue;
      }

      if (i === 0 && !item.isDeleted) {
        return item;
      }

      if (!item.isDeleted) {
        i--;
      }
      queue.push(...item.children);
    }

    return null;
  }
有了findItemByIndex有,删除就十分简单了:
  public delete(pos: number) {
    const item = this.findItemByIndex(pos);
    if (!item) {
      throw new Error("Item not found");
    }
    item.isDeleted = true;
    this.length -= 1;
  }
最后,解释一下最复杂的integrate:
private integrate(item: Item<T>) {
    const lastClock = this.vector[item.id[0]] ?? 0;
    const clock = item.id[1];
    if (lastClock >= clock) {
      // This item has been integrated
      return;
    }
    if (lastClock + 1 !== clock) {
      throw new Error("Clock not match");
    }
    this.vector[item.id[0]] = clock;
    // 1. Find the parent item
    // 2. Insert the new item to parent.children, compare the id of new item and the next item
    // 3. Update the version and length of doc
    const parent =
      item.parent![1] === 0
        ? this.store.get(Id.hash(this.root))!
        : this.store.get(Id.hash(item.parent!))!;
    if (!parent) {
      // Root item can not integrate
      throw new Error("Parent not found");
    }

    let destIndex = 0;
    for (; destIndex < parent.children.length; destIndex++) {
      const child = parent.children[destIndex];
      // Smaller id should at left
      if (item.id[0] <= child[0]) {
        break;
      }
    }

    parent.children.splice(destIndex, 0, item.id);
    this.store.set(Id.hash(item.id), item);
    if (!item.isDeleted && item.content !== null) {
      this.length += 1;
    }
  }
integrate 有三个核心步骤:
clock去重逻辑,如果item已经被集成到文档树中,那么就不需要再次集成了;- 找到
item的parent,然后将item插入到parent.children中,这里需要注意的是,item的id需要和parent.children中的id进行比较,保证id小的在左边,大的在右边; - 更新
doc的length和vector;
TinyAutomerge
Automerge 是为数不多将 RGA 用在生产环境上的 CRDT 库,RGA 是 Automerge 中的核心算法部分,设计方式和实现思路都很有借鉴性。
笔者实现了一个 toy 版本:TinyAutomerge。
TinyAutomerge 是 Automerge 的一个极简版本,它是按照笔者个人理解以及 Automerge 文档来实现的,可以帮助我们更好的理解 Automerge 和 RGA。
Automerge 中 RGA 的实现文档其实已经被官方文档删除掉了,笔者在 github 上找到了以前的 commit,然后将其复制到了飞书文档,希望能帮助到对 Automerge 感兴趣的人
TinyAutomerge 支持两种 CRDT 数据类型以及其基本操作:
- List(Text):
insert(pos, content)delete(pos)put(pos, content)get(pos)range(start, end)
- Map:
put(key, value)get(key)delete(key)range(start, end)
Text 纯文本本质上和 List 是一样的,因此这里没有额外实现。
下面就 Automerge 核心数据结构建模以及基本操作伪代码做一个简单的介绍。
数据结构建模
TinyAutomerge仍然以Operation(操作)作为核心建模方式,任何一个基本操作,包括insert、delete、put、get都可以被抽象为一个Operation:
export type Operation<T> = {
  id: OpId;
  prop: string; // map property name or array insert|update origin intention
  insert: boolean;
  value: T | null | "make(map)" | "make(list)"; // null means delete
  pred: OpId[];
  succ: OpId[];
};
这里的OpId其实也是 Lamport 时钟,也即是[actorId, clock],actorId是一个字符串,clock是一个数字。
在Automerge中 actorId 其实就是siteId。
每个Operation都有唯一的id,insert字段表示是否为插入操作;
prop字段略微有点特殊,对于Map来说,prop就是map中的某个key,对于List来说,prop 操作意图,即插入位置前一项。
另外 pred 和 succ 字段分别标识操作的前驱、后继操作,以Map为例,如果多个put操作的key相同,那么这些put操作的pred和succ就会形成一个双链表,最后的操作在链表最后端。
如果Operation的 succ 不为空,证明这个Operation已经过期了,因为有新的Operation插入到了这个Operation之后。
而delete略有不同,因为 delete 没有实际的删除数据,只是将上一个Operation的succ指向自己,这样就可以将Operation从链表中软移除了。
同样地,文档是操作的集合:
type OpTree<T> = {
  parent: ObjId | null; // null means root
  objType: ObjType; // map or list
  store: Array<Operation<T>>; // sorted by OpId or Prop
};

type OpSet<T> = {
  // Op trees
  trees: Map<ObjId, OpTree<T>>;
  // The length of op array
  length: number;
};

export type Doc<T> = {
  ops: OpSet<T>;
  // The current actor.
  id: Actor;
  // The maximum operation counter this document has seen.
  maxOpCount: number;
};
Doc核心数据实际就是op的集合,即OpSet。OpSet 下可以有多个 OpTree,每个 OpTree 对应一个Map或者List,OpTree 中的store是一个操作有序数组,parent指向父节点,objType标识是Map还是List。
从这里就可以得出,对于Map和List的操作一般需要两步:
- 在
OpSet中找到对应的OpTree,如果没有就创建一个; - 在
OpTree中查找、变更、对应的Operation;
Map
了解了基本数据结构后,我们就可以来看看Map的基本操作实现了。
get
伪代码:
def get(store, prop):
    operations, _ := search(store, prop);
    last := operations[opertaions.len - 1];
    return last.value;

def search(store, prop):
    result := [];
    start_idx := index of the first row that matches prop
    end_idx := store.length
    for i in range(start_idx, end_idx):
        if store[i].prop != prop:
            return result, i;
        result.append(store[i]);
    return result, end_idx + 1;
get(prop):
- 查找
store,找到与prop相关的所有Operation; - 返回最后一个
Operation的value;
put
伪代码:
def put(store, prop, value):
    operations, last_idx := search(store, prop)
    last := operations[opertaions.len - 1];
    pred := [last.id]

    local_op := {
        op: lamport_clock_inc(),
        obj: table.objId,
        prop,
        value: "{value}",
        pred,
        succ: []
    }
    last.succ.append(local_op.id);
    insert_op(store, local_op, last_idx);
put(prop, value):
- 查找
store,找到与prop相关的所有Operation; - 生成一个新的
Operation,pred指向最后一个Operation; - 将最后一个
Operation的succ指向新的Operation; - 将新的
Operation插入到store中;
delete
伪代码:
def delete(store, prop):
    operations, _ := search(store, prop)
    last := operations[opertaions.len - 1];
    pred := [last.id]

    new_clock := lamport_clock_inc()
    last.succ.append(new_clock);
delete(prop):
- 查找
store,找到与prop之相关的所有Operation; - 生成新的
lamport_clock,加入到最后一个Operation的succ中;
delete 不会生成新的Operation,而是将最后一个Operation的succ指向新的lamport_clock,这样就可以将Operation从链表中软移除了。如下:
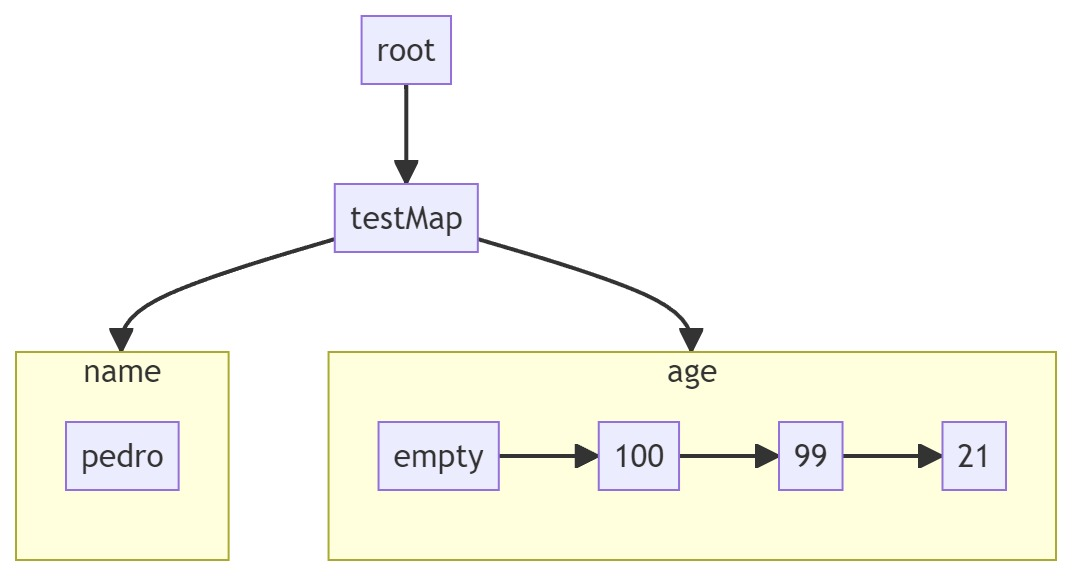
empty表示空的Operation,只有一个lamport lock并指向age最后一个Operation 100,从而达到删除age的效果。
List
List的实现稍微复杂一点,因为List没有明确的key,而index也是动态变化的,所以找到会更加麻烦一点。
get
伪代码:
def get(store, index):
    operations, _ := nth(store, index);
    last := operations[operations.len - 1];
    return last.action.value;

def nth(store, index):
    seen = 0;
    // current position
    pos := 0;
    // result operations
    res = [];

    for operation in store:
        if operation is insert:
            if seen > index:
                return res, pos;

        if operation.insert && operation.succ.length == 0:
                seen += 1;

        if seen == index && operation.succ.length == 0:
            res.append(operation);

        pos++;

    return res, pos;
get(index):
核心点在
nth即找到第index个Item上,注意不是Operation。 一个列表Item会包括一个或者多个Operation。
- 遍历
store,找到第index个Item; - 返回最后一个
Operation的value;
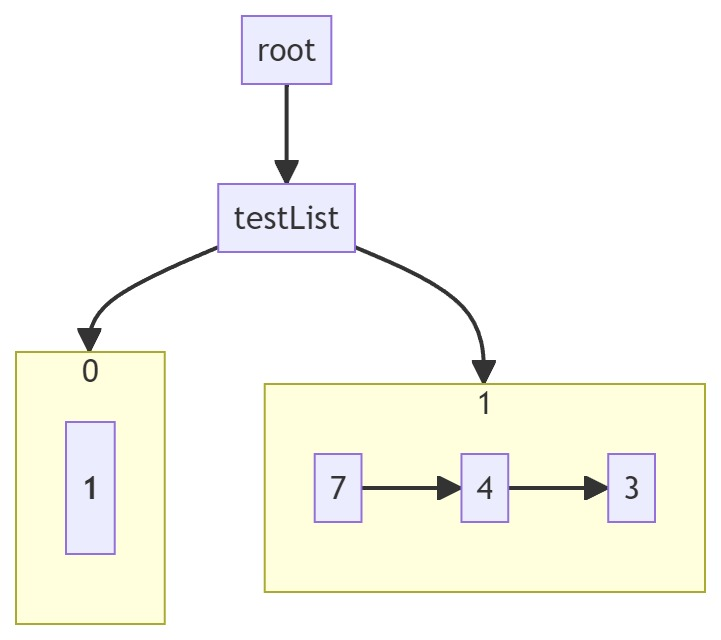
如上图所示,第0项 Item 只有 1 个Operation,第1项 Item 有 3 个Operation。
delete
伪代码:
def delete(store, index):
    operations, _ := nth(store, index);
    first := operations[0];
    new_clock := lamport_clock_inc()
    first.succ.append(new_clock);
delete(index):
- 遍历
store,找到第index个Item,即operations; - 生成新的
lamport_clock,加入到第一个Operation的succ中;
这里与 Map 不同,Map 的
delete是在最后一个Operation上加入新的lamport_clock,而 List 是在第一个Operation上加入新的lamport_clock。
insert
伪代码:
def insert(store, index, value):
    operations, idx := nth(store, index);
    firstOp = operations[0];
    prop = firstOp ? (firstOp.insert ? firstOp.id : firstOp.prop) : obj;
    pred = firstOp ? [firstOp.id] : [];
    local_op := {
            op: lamport_clock_inc(),
            obj: store.id,
            prop,
            action: "{value}",
            succ: null,
            pred,
    };
    if firstOp:
        firstOp.pred.append(local_op.id);
    insert_op(store, local_op, idx);
insert(index, value):
- 遍历
store,找到第index个Item; - 生成一个新的
Operation,pred指向firstOp,firstOp 可能为空,即插入一个新的Item; - 将
firstOp的pred指向新的Operation; - 将新的
Operation插入到store中;
put
伪代码:
def put(store, index, value):
    operations, idx := nth(store, index);
    if operations.len == 0:
        return; # not found
    firstOp = operations[0];
    prop = firstOp.id;
    pred = firstOp ? [firstOp.id] : [];
    local_op := {
            op: lamport_clock_inc(),
            obj: store.id,
            prop,
            action: "{value}",
            succ: null,
            pred,
    };
    firstOp.pred.append(local_op.id);
    insert_op(store, local_op, idx);
put(index, value)基本与insert类似,但 put 不能插入新的Item,只能修改已有的Item。
因此未找到Item时,直接返回;而prop实际就是firstOp.id,第一个插入Operation的 id。
对于Text,其实本质与List大差不差,只是value是一个字符而已,当然如果需要支持富文本,那就没那么简单了。
RGA 富文本实现可参考peritext。
结语
本文以 RGA 为切入点,介绍了其基本原理和实现,并参考 RGA 在 Automerge 中的设计,给出了 TinyAutomerge 的实现。
希望能够帮助读者对 CRDT 与 RGA 有一个更加深入的理解。